You were the one that wanted the kids to be creative. You sent him technology camp last summer. You asked her to think outside the proverbial box. Now the chickens have come home to roost. They asked for a 3D printer for Christmas.
And you bought one.
The problem is, you have no idea what one is or does. Right now it’s in the neighbor’s garage and in a few days you are going to appear to be the Luddite / moron / loser in the family when you can’t answer questions or even explain how it works.
No problem. We’ve got you covered. This is, after, The Parents Guide to 3D Printing. Let’s spend the next few hundred words getting you acquainted with 3D printing so that you are, for the moment, cool.
What is 3D Printing?
That is a bit of a loaded question. There are several types of 3D printing, and many different materials to use. Another name for 3D printing is additive manufacturing, and this may help explain what it is.
Note the word additive, as in to add. In general, 3D printing creates objects (in three dimensions) from some sort of soft material that can be formed and then later hardened. Typically, this material is added, layer by layer, until the object is complete.
The materials used vary widely. At the high end, some printers use powered metal and then join it together with lasers. Others use human tissue to make ears and other body parts. These are not generally home applications, but hey, you really did tell her to think outside the box.
At the other end of the spectrum, namely home and small business users, the material is generally plastic in some form. It may be liquid or in the form of filament, like fishing line, only thicker.
What Type of Printer Did I Buy?
As mentioned earlier, most home printers use liquid or solid plastic. The liquid printers use a resin that is firmed up using a laser or LED display (think tiny TV). The resin is placed in a tank with the laser / TV under the bottom, and when the light strikes the resin it hardens and sticks to itself. Shine the light in the right places and you can create a picture out of plastic. Add another thin layer of resin and repeat many times and you eventually get a 3D object. This is called SLA, or stereolithography, printing. It can be messy and requires curing and cleaning of the final print. In other words, you probably did not buy one of these printers. Oh, they’re kind of expensive too.
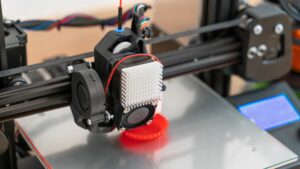
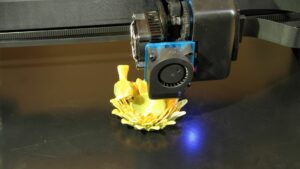
The more common home 3D printer uses a technology called FDM, or Fused Deposition Modeling. (Note: This is a good term to learn to impress your kids.) In FDM, a plastic filament is fed into a heated block (the print head) by a toothed gear. When it enters the block it melts, becoming a gooey sludge. As more filament comes into the block, the goo has to go somewhere, and that is out the tiny hole at the other end. Move this print head around close to a metal plate and the goo sticks to the plate as it cools and forms a pattern. Move the print head up a tiny amount and repeat this process, and the next layer of plastic is placed on the first. Repeat many times to get a 3D printed object. Less messy than SLA, FDM printers can be had from as little as $77 up to about $1500 for a really nice home unit. High end professional models can easily exceed $10K, but your kids are not that special.
Wait, I Don’t Understand
Yeah, I get that. Let’s look at a couple of examples. We’ll start with that inkjet photo printer you bought five years ago.
In inkjet technology, the printer sprays ink onto the paper putting the appropriate color in the right places. One layer and you’re done; the print comes off in a few minutes. There’s that photo of you at the beach. Wait, did you gain that much weight during COVID?
Now, imagine that we replace the ink with paint. Thick paint. The printer again sprays it on, and the image takes shape. One layer, one flat image. But now picture the printer pulling the paper back in and applying another layer of paint. Still rather flat, but thicker. Repeat this process 100 times and you have a very think print. A three-dimensional print. Hence, a 3D printer.
To envision the FDM printer think back to Playdough. You do remember Playdough, right? You could roll it into ropes and make shapes. Well, picture a rope of Playdough laid out into a circle, and when the circle ends meet, run a second layer on top of the first one. When the ends meet, put a third layer on top of the second one. After about twenty or thirty layers you have a cylinder. Not a terribly useful cylinder, but a cylinder, nonetheless.
This is Mighty Expensive Playdough
So you dropped $500 on that box at the neighbor’s house and Playdough would work? Nope, your 14-year-old son playing with Playdough is not going to go over well on social media. A 3D printer is.
The 3D printer allows the user to create almost anything imaginable in three dimensions. In fact, you can print objects on an FDM printer that cannot be made any other way. This was a good investment for the technologically curious child.
So, What Do My Kids Need to Print?
That’s simple – a printer, filament, and a model file (a design).
You’ve got the printer part covered. Good job.
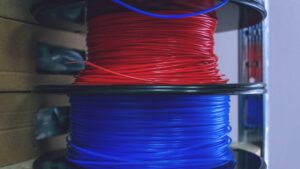
The filament, as mentioned above, is thick fishing line. Well, not really, but they are cousins. It typically comes on a spool, with the 1 kg size being most common. A 1 kg spool is about eight inches in diameter, about two inches thick, and weighs, yep, 1 kg. That’s a bit over two pounds for those non-geek parents. We’ll come back to filament later.
The model file is where the magic really happens. This file is like a Word document, just in a different format. It is actually a bunch (thousands) of commands to tell the printer how to move the print head around, when to feed filament, and when to move to the next layer. It is just another file on the computer.
Do I Buy These Files? Sounds VERY Expensive
You can, but you almost never do. There are two basic ways to get these files: download (remember Napster) and creation. One is easy; the other is a bit more complicated (but more rewarding).
Unlike Napster, downloading of these files is perfectly legal, easy, and encouraged. A LOT of very creative people in the world have uploaded files to make 3D prints of almost anything that you can imagine. Need a napkin holder? Over 400 designs on Thingiverse. Ring doorbell accessories or brackets? Over 300 for downloading. All free for non-commercial use.
Or, and here’s where you want that creativity to shine through, your kids can create their own designs. There are at least a dozen 3D modeling programs out there that are free. Here is a list to get you started. Add to that a few paid programs, and your children can design anything.
What’s a Thingiverse?
It’s Napster for 3D designs. Found at thingiverse.com, it allows users to search for designs to print. Or users can upload their designs for others to use. It is a giant 3D design sharing site.
It is not the only such site, just the largest. Use the Google machine to find others.
This File Gets Copied to the Printer and That’s It?
No. Hey, I said I’d educate you, but I didn’t say it would be easy.
First you must slice the file. Remember when you envisioned the photo printer and paint? Each layer added to the final product. Well, when you have a final product design, it must be sliced into layers that the printer can understand. That is the job of the slicer.
Another note here. Understanding the slicer (and remembering its name) will get you more cool points.
Slicers are available from any different places, and most are free to download. If your printer in the neighbor’s garage is from one of the larger brands (Prusa, Bambu, Creality, and several others) you will probably have access to download a slicer from the manufacturer’s web site. When starting out it is HIGHLY recommended that you use the manufacturer’s slicer just to make sure the printer is working normally. When your kids later want to download an open-source slicer for some new feature, that’s great. You can have multiple slicers on your computer, and they won’t argue with each other.
The file coming into the slicer is probably going to a be an STL file (has a .stl extension). The slicer will take this file and convert it to thousands of commands to control the printer, layer by layer. This output file is typically a GCODE (.gcode) file. It is this file that goes to the printer.
Exactly How Does the File Get There?
Now we’re really getting printer-specific. There are four common ways:
- SD card
- USB cable
- Wi-Fi or Ethernet (local)
- Cloud
If that new printer uses an SD card, just export the GCODE file from the slicer to the card. Put the card in the printer’s slot for said card, and that’s it. This is the way that Prusa does it for their i3 series.
For USB, local LAN, and cloud, you are probably going to use the slicer software itself. Yet another good reason to use the manufacturer’s software to get started. There will be some sort of option to send to printer, but this will vary depending on the software itself. Bambu printers use the cloud option (or SD card) and the user just selects Print.
A Few Words on Slicer Settings
When the kids’ first prints do not come out as planned, you know who is getting the questions. Here’s your chance to really be a hero. Know thy Slicer.
OK, not all of it. But do remember the cardinal rule of 3D printing: Slower is Better. Remember that. Patience is absolutely required when 3D printing, and new users will want to rush the prints. If they look like dog doo, slow down! This is especially true for the first layer. Slow first layer and then speed up a little on subsequent ones.
Or just use the default settings for the filament being used. The manufacturer has tested this stuff.
Are All Filaments Basically the Same?
Sure, just like your minivan is a Ferrari at heart. They are nowhere close. Except that most (not all) are just plastic.
Let’s discuss materials. Your box in the garage next door might contain a sample spool of filament, probably PLA. (Dad note: That is pronounced Pee-Ell-Ay, not plah or play. You say plah, and you sound dorky.)
If you did not get a free spool (and did not order any filament) woe be unto thee. For without filament there is no printing on Christmas day. Start calling geeky neighbors and begging.
If you did order filament, let’s hope you ordered PLA. This is an excellent all-around filament that is very easy to print, relatively strong, durable to a point, and comes in great colors. Some call it a starter filament, but lots of printers never find a need to use anything else.
If you failed the PLA test you can get partial credit if you ordered PETG instead. Not quite as easy, but still simple enough to print. It is stronger and comes in translucent colors. But it absorbs water.
Side note, but one that gets you serious geek cred. Plastics absorb water. Period. Some filaments aren’t bad, like PLA. Some, like most Nylons, are sponges. Water in plastic filament is bad because it causes the final print to be stringy (a like poodle on a bad hair day) and you can hear the printer spitting when printing (it’s boiling off the moisture). If your kids’ prints look stringy, tell them the filament is probably damp. If it’s PLA, see this link for drying tips. Other filaments on the site also have these tips.
If you ordered Nylon Carbon Fiber to be really cool, well, good luck. Read up on drying and I hope you got a heated bed.
There are many other material options, and many options within options. For instance, you will find PLA, Tough PLA, Pro PLA, PLA-CF, Matte PLA, Silk PLA, color changing PLA, rainbow PLA, and quite a few others. All use PLA as the base ingredient, but all have slightly different properties and print slightly different. Consult the manufacturer’s web site and study up before Christmas morning.
Color generally doesn’t matter. Within a PLA line, any color will pretty much print the same as another. One exception is Glow-In-The-Dark PLA, and it can be damaging to some print heads. Again, read about the filament you bought. You did buy filament, right?
Let’s Talk Safety
You are the parent and know best when your child is best ready for this tool. Just as you would not give six-year-old Johnny a circular saw, be aware that there are some minor risks in 3D printing.
The first and most obvious is that print head melts plastic, and that means it gets hot. Geek points if you remember to tell your kids that PLA generally prints at about 210° C (about 450° F). That’s a small area of heat, but you only get burned once to remember that you don’t want to repeat that experience. Warn the kids to keep their fingers and tongues away from the print head.
The not so obvious safety concern only affects some printers. Many new printers have gone to removable steel beds. The bed, by the way, is what the print is printed on. Remember the terminology. With these beds, when the print is complete, the user lifts the bed from the magnetic base, flexes it, and the print pops off. That’s easy.
But, if you do not have a removable bed, then getting the part off the non-flexing bed is, shall we say, challenging at times. Users may want to employ hand tools not intended for the job, and these may damage the bed or the hands. It is best to use a removal tool to carefully pry the print from the bed. Or you can make one by grinding the sharp corners off a flexible putty knife.
Finally, the big injury risk is with support removal. Supports are parts of a print used to assist in printing, but which are not part of the final object. When the print is complete, these must be removed, and that can be difficult – and painful. There will be a tendency to want to use knives, pliers, and perhaps a grinder at times. All of these can cause serious injuries and you need to keep an eye out for stupid behavior.
Tips to Make Christmas Day a Happy Printing Day
- Slower is better. Remember that.
- Use glue. Spreading a thin coat of glue from an ordinary glue stick on the bed will make prints adhere much better. This should not be used on all beds, so look at the manual, but if the Christmas Day prints keep breaking loose from the bed, this is a great fix.
- Start simple. Yes, your kids will want to print that one-eight scale model of the Millenium Falcon as their first print. Bad idea. Suggest something small and useful for Mom or Dad, like one of those napkin holders. And don’t do anything requiring supports for the first print.
- Use PLA. If you bought multiple types of filament for the kids, give the PLA on Christmas Day and hold off on the others until at least Boxing Day. Everyone will appreciate this.
- By the way, you might tell your kids that PLA is made from natural ingredients like sugarcane and is much more environmentally-friendly than petroleum-based filaments.
Still have Questions?
This short primer is designed to get you safely and happily through Christmas Day. And maybe through New Years Day. But if your kids really take to their printer, be prepared for questions. And if you can’t find answers, email us at info@filamatrix.com. We make filament; we have answers.
Shameless Plug
We suggest that you buy your filament from Filamatrix. It’s made right here in Southwest Virginia and shipped anywhere in the USA and Canada. And we have several varieties of PLA as well as more industrial filaments like Nylon Kevlar. That’s for when the kids are ready to up their game.